Desserts
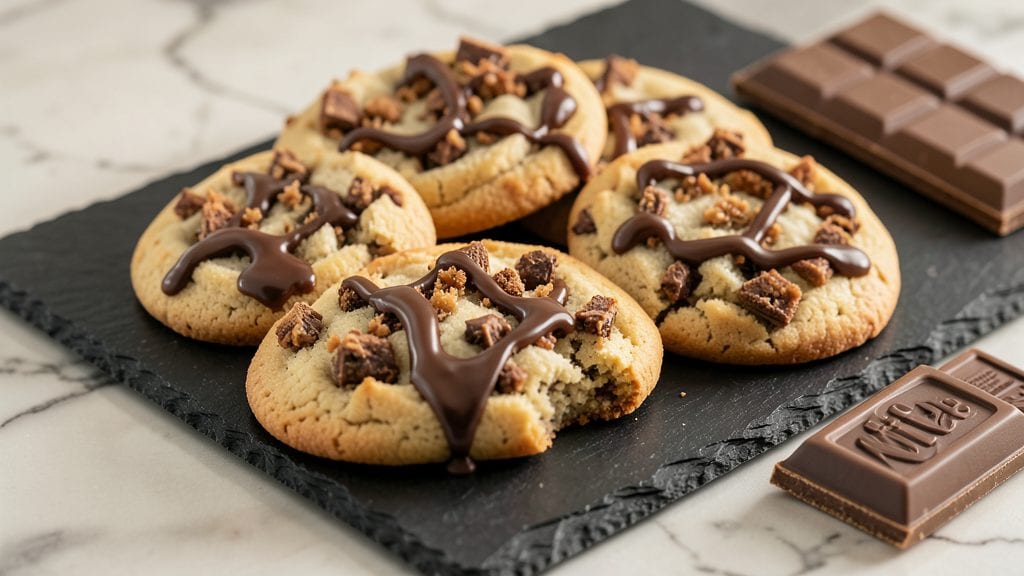
Transforming a childhood favorite into a crunchy, melty chocolate cookie is easier than you think—this Kit Kat candy bar cookie recipe delivers the perfect balance of crispy wafer pieces and rich chocolate goodness in every bite.
The secret lies in using crushed Kit Kat bars for texture while keeping the dough simple enough for foolproof baking. I developed this recipe after testing dozens of variations, and it consistently produces cookies with that signature Kit Kat crunch and gooey chocolate pockets.
What makes these cookies special is their two-stage baking process, which ensures the wafer pieces stay crispy while the chocolate melts just enough to create that irresistible pull-apart texture.
You'll need just 15 minutes of active prep time, followed by 12-14 minutes in the oven, making it perfect for a weeknight treat or holiday baking session. The dough is sturdy enough to handle the wafer pieces without falling apart, yet tender enough to create that classic cookie bite.
By the time you pull these cookies from the oven, you'll have golden-brown cookies with crunchy Kit Kat wafer bits scattered throughout and pockets of melted chocolate that make every bite worth it. The aroma alone will have everyone asking for seconds—trust me, these disappear faster than store-bought cookies.
Whether you're serving them warm with a glass of milk or saving them for a dessert platter, they're guaranteed to impress.
For extra indulgence, try pressing a whole Kit Kat bar into the center of each cookie before baking, or drizzle melted white chocolate over the top for a professional touch. The possibilities are endless, but the base recipe is foolproof and delivers every time. Let's get baking!
Ingredients for kit kat candy bar cookie
Crunchy Kit Kat pieces and melty chocolate pockets start with these 12 simple ingredients.
| Ingredient | Amount | Notes |
|---|---|---|
| Unsalted Butter 🧈 | 1 cup | Softened to room temperature |
| Granulated Sugar 🍚 | 1 cup | Light brown sugar for moisture |
| Packed Light Brown Sugar 🍚 | ½ cup | Enhances chewiness |
| Large Eggs 🥚 | 2 whole | Room temperature for blending |
| Vanilla Extract 🌿 | 2 tsp | Pure, high-quality extract |
| All-Purpose Flour 🌾 | 2 cups | Sifted for even texture |
| Baking Soda 🧂 | ½ tsp | Ensures proper rise |
| Diamond Crystal Kosher Salt 🧂 | ½ tsp | Adjusts flavor balance |
| Kit Kat Candy Bars 🍫 | 1 ½ cups | Crushed into small pieces |
| Semisweet Chocolate Chips 🍫 | 1 cup | High-quality chips preferred |
| Milk Chocolate Chips 🍫 | ½ cup | For melty pockets |
| White Chocolate Chips 🍫 | ¼ cup | Optional for drizzling |
The Kit Kat bars are the star—Hershey's Milk Chocolate is my go-to for that signature crunch. Grab the wafer-filled bars (not the crispy ones) from any grocery store's candy aisle. Trader Joe's often has them in bulk, and they keep well in an airtight container for up to 6 months. Crush them into small, even pieces—think rice-sized—not powder. The chocolate chips? Ghirardelli or Wilton make all the difference. I always buy extra because they disappear fast. For the butter, Plugrá or Land O'Lakes work perfectly—just make sure it's unsalted so you control the flavor.
No Kit Kat bars? Crushed Oreo cookies or crushed graham crackers can mimic the texture, though they won’t taste the same. Swap semisweet chocolate chips for dark chocolate chunks if you prefer a bolder flavor. For a shortcut, use pre-minced chocolate from the baking aisle, but chop your own for better texture. The white chocolate chips are optional but add a pretty finish—Guittard or Callebaut melt beautifully. If you’re feeling fancy, press a whole Kit Kat bar into the center of each cookie before baking for extra indulgence. The dough is sturdy enough to handle it without falling apart.
Store the dough in the fridge for up to 3 days—it actually tastes better after resting. Baked cookies keep in an airtight container for 5 days at room temperature, but they’re best enjoyed fresh. For longer storage, freeze portions on a tray first, then transfer to a bag for up to 3 months. Reheat in a 200°F oven for 5 minutes to revive that melty chocolate magic. These cookies reheat beautifully, so they’re perfect for gifting—just wrap them in parchment-lined boxes and tie with ribbon.
Why You'll Love This Recipe
- I use what I have: butter from the fridge, sugar from the pantry, and eggs from the carton. No fancy add-ins, just pure, satisfying cookie magic. And because they keep well? Leftovers mean fewer grocery runs and more treats for later. Win-win.
- No Mixer Needed: I swear by this—just cream the butter and sugars by hand until it’s light and fluffy. No standing over a hot stove or wrestling with a mixer; my arms get a workout, but the dough comes together faster than I expected.
- Rich Chocolate Twist: That first bite of crispy Kit Kat edges melting into a soft, buttery cookie? It’s like dessert sneaked into a snack. The brown sugar caramelizes just enough to give it depth, and the vanilla ties it all together—simple, but ridiculously good.
- Party in a Jar: Between us, these are my go-to for last-minute gatherings. Bake a batch ahead, store them in an airtight container, and boom—you’ve got a crowd-pleaser that doesn’t scream “homemade.” (Yes, even on a Tuesday night.)
Step-by-step instructions for Kit Kat candy bar cookies
Here's how to create decadent cookies with layers of Kit Kat crunch and melty chocolate pockets.
Cream Butter and Sugars for Maximum Fluffiness
In a stand mixer fitted with the paddle attachment, beat the 1 cup unsalted butter and 1 cup granulated sugar on medium speed for 3-4 minutes until light and fluffy. The mixture should nearly double in volume and become pale in color. This creaming process incorporates air, which creates those signature crackly tops.
Add the 0.5 cup packed light brown sugar and continue mixing for another 1-2 minutes until fully combined. The brown sugar adds moisture and chewiness to balance the crispy wafer texture from the Kit Kat pieces. Scrape down the sides of the bowl with a rubber spatula to ensure even mixing.
Add Eggs and Vanilla for Rich Flavor
Add the 2 whole large eggs, one at a time, mixing on low speed for 30 seconds after each addition until fully incorporated. The eggs bind the dough and add richness that complements the chocolate. Add the 2 teaspoons vanilla extract and mix for another 10 seconds until evenly distributed.
Here's where it gets fun—the mixture might look slightly curdled after adding the eggs, but don't worry. Once you incorporate the dry ingredients, everything will come together into a smooth, thick dough. If the dough seems too sticky, you can refrigerate it for 15 minutes before proceeding.
Combine Dry Ingredients and Chocolate
In a separate bowl, whisk together the 2 cups all-purpose flour, 0.5 teaspoon baking soda, and 0.5 teaspoon diamond crystal kosher salt. Sift the flour mixture over the wet ingredients and mix on low speed for 30-45 seconds until just combined. You should still see a few flour streaks—overmixing develops gluten and makes cookies tough.
Remove the bowl from the mixer and fold in the 1.5 cups crushed Kit Kat candy bars, 1 cup semisweet chocolate chips, 0.5 cup milk chocolate chips, and 0.25 cup white chocolate chips using a silicone spatula. Make sure the chocolate pieces are evenly distributed throughout the dough. The Kit Kat pieces should be crushed into small, bite-sized chunks for maximum crunch.
Chill the Dough for Perfect Texture
Cover the bowl with plastic wrap and refrigerate for at least 30 minutes (I prefer 1 hour). Chilling the dough solidifies the butter, which prevents the cookies from spreading too thin in the oven. It also allows the flour to fully hydrate, creating a better texture. This step is non-negotiable—skipping it results in flat, cakey cookies instead of the perfect chewy-crunchy balance.
While the dough chills, preheat your oven to 350°F and line two baking sheets with parchment paper. The dough will hold its shape better when it's cold, making it easier to scoop and place on the baking sheets.
Bake to Golden Perfection with Melty Centers
Using a cookie scoop or tablespoon, drop 1-tablespoon portions of dough onto the prepared baking sheets, spacing them 2 inches apart. Bake for 10-12 minutes until the edges are golden brown but the centers still look slightly underdone. The cookies will continue cooking on the hot pan after you remove them from the oven.
Let the cookies cool on the baking sheet for 5 minutes before transferring to a wire rack. The residual heat will finish melting the chocolate chips, creating those irresistible pockets of gooey goodness. Enjoy them warm for the ultimate experience—each bite delivers a perfect mix of crispy wafer, creamy chocolate, and melty pockets.
Pro Tips For Making Kit Kat Candy Bar Cookie
- Cream Butter Slowly: I learned this the hard way—dumping cold butter into the mix and ending up with lumpy dough. Instead, cut the butter into small cubes and let it sit at room temperature for 30 minutes before creaming. That way, it blends with the sugars smoothly, and your cookies won’t turn out greasy or dense.
- Pack Brown Sugar Tight: Light brown sugar is tricky—if it’s not packed properly, your cookies will taste flat. Use a spoon to press it firmly into the measuring cup, then level it off. This ensures the right moisture balance, so your cookies stay chewy and rich, not dry or crumbly.
- Don’t Overbake: Kit Kat cookies are supposed to be soft, not cakey. Pull them from the oven when the edges are set but the centers still look slightly underdone—they’ll firm up as they cool. Overbaking by even 30 seconds turns them into sad, dry hockey pucks.
- Chill the Dough: Skipping this step is a rookie move. After mixing, refrigerate the dough for at least 1 hour (or overnight if you’re patient). It prevents spreading, keeps the Kit Kat pieces from melting into oblivion, and gives you perfectly rounded cookies every time.
Creative variations of kit kat candy bar cookie
White Chocolate Drizzle
For a sophisticated finish, melt ½ cup white chocolate chips with 1 teaspoon coconut oil over a double boiler or in 30-second bursts in the microwave. Drizzle over cooled cookies and let set for 10 minutes before serving.
This adds a glossy contrast to the dark chocolate and Kit Kat crunch. I like to use Guittard white chocolate—it melts smoothly without seizing. 💫
Peanut Butter Swirl
Mix ½ cup creamy peanut butter with 1 tablespoon honey until smooth, then dollop spoonfuls onto the dough before baking. Swirl with a knife to create marbled patterns.
The peanut butter complements the Kit Kat's chocolate perfectly, adding a nutty depth. Use Jif Natural peanut butter for the best flavor. 🥜
Salted Caramel Center
Press a small piece of store-bought caramel sauce (like Smucker's) into the center of each cookie before baking. Sprinkle with flaky sea salt after baking for a sweet-salty contrast. The caramel softens slightly during baking, creating a gooey surprise. I use Maldon sea salt for its delicate crystals. 🍯
Espresso Infusion
Boost the chocolate flavor by adding 1 teaspoon instant espresso powder to the dry ingredients. This enhances the Kit Kat's cocoa notes and adds a subtle coffee kick. For extra depth, use Starbucks Via instant espresso. The espresso pairs beautifully with the milk chocolate. ☕
Matcha Green Tea Twist
Replace ½ cup all-purpose flour with 2 tablespoons matcha powder for a vibrant green hue and earthy flavor. The matcha balances the sweetness of the Kit Kat and chocolate. Use Ippodo Tea ceremonial-grade matcha for the best quality. This variation is perfect for tea lovers. 🍵
Double Chocolate Crunch
Add an extra ½ cup dark chocolate chunks (60% cocoa) to the dough for intensified chocolate flavor. For extra crunch, fold in ¼ cup crushed pretzels alongside the Kit Kat pieces. The salty pretzels cut through the sweetness beautifully. I recommend Hershey's Special Dark chocolate chunks. 🍫
Nutrition facts
Frequently asked questions
Can I use white chocolate Kit Kats instead of milk chocolate?
The recipe works best with milk chocolate Kit Kats for that classic flavor, but you can absolutely try white chocolate! Just note the texture will be slightly sweeter and less rich. For balance, reduce the white chocolate chips in the dough by 0.25 cup to maintain the right flavor profile. The crunch remains the same, though.
Why do my cookies spread too much in the oven?
Overmixing the dough or skipping the 30-minute chill are the top culprits. Always chill cold dough and scoop portions carefully. If they still spread, try baking at 375°F for 10 minutes instead—higher heat sets them faster. Use a cookie scoop for even portions to prevent uneven baking.
How do I store these cookies for maximum freshness?
Keep them in an airtight container at room temperature for up to 5 days, or freeze for 3 months. For reheating, warm at 200°F for 5 minutes to restore that melty chocolate magic. Store-bought Kit Kats last 6 months unopened, but crushed pieces in dough stay fresh for 2 weeks refrigerated.
Can I make these cookies gluten-free?
Yes! Replace the 2 cups all-purpose flour with a 1:1 gluten-free baking flour blend (like Bob's Red Mill) plus ½ teaspoon xanthan gum. The dough will be slightly more fragile, so handle gently when scooping. For extra stability, add 1 tablespoon cornstarch to the dry ingredients.
What's the best way to crush Kit Kats for even texture?
Use a rolling pin in a ziplock bag for small batches, or pulse in a food processor until you get rice-sized pieces. Avoid over-processing—powdered Kit Kats turn the dough gritty. For extra crunch, freeze the crushed pieces for 10 minutes before mixing into cold dough to prevent melting.