
Desserts
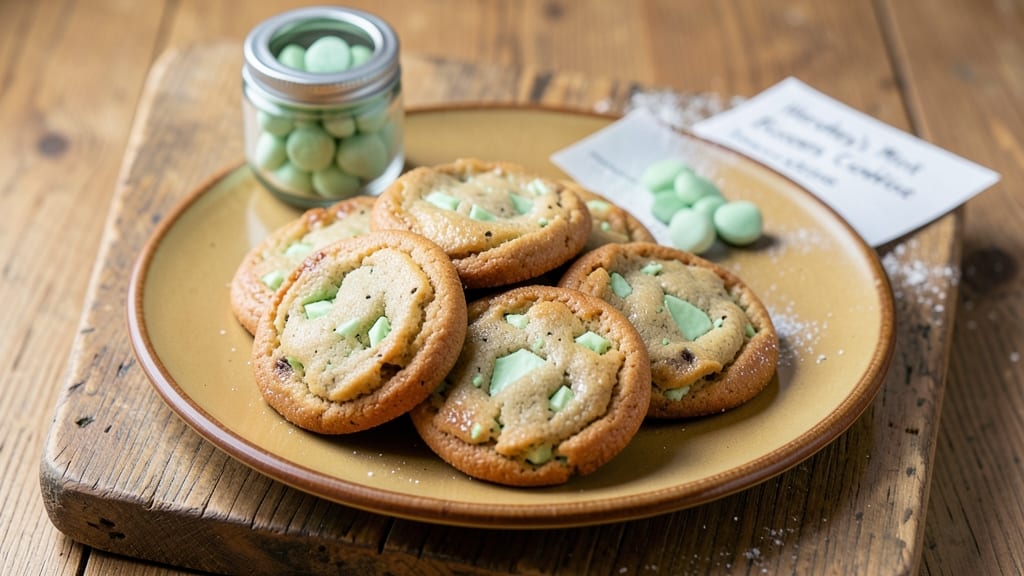
This Hershey's Mint Kisses cookies recipe brings holiday cheer to your kitchen with its perfect balance of rich chocolate and refreshing mint. The secret lies in using crushed mint kisses mixed into the dough and melted chocolate for that signature festive flavor.
I've perfected this recipe over years of baking, ensuring every bite delivers that nostalgic holiday taste.
What makes these cookies special is their foolproof method—no fancy techniques required. You'll need just 15 minutes of prep time, followed by chilling the dough for 30 minutes (don't skip this step!).
The result is cookies with crisp edges, tender centers, and pockets of melted chocolate that stay gooey even after baking. The mint flavor shines through without overpowering the chocolate.
By the time they emerge from the oven, you'll have cookies that look as festive as they taste—golden brown with visible chocolate chips and crushed mint kisses.
The aroma alone will have everyone asking for seconds. These cookies are perfect for holiday gatherings, gift-giving, or simply treating yourself to a taste of the season.
For extra flair, decorate with additional crushed mint kisses or a drizzle of melted chocolate before serving. Let's create these festive treats that taste like a holiday hug in every bite.
Ingredients for hershey mint kisses cookies
Festive chocolate-mint magic starts with these 13 simple ingredients—crushed mint kisses and all.
| Ingredient | Amount | Notes |
|---|---|---|
| Hershey's Mint Kisses 🍫 | 1 ½ cups | Crushed into fine pieces |
| Unsalted Butter 🧈 | 1 cup | Cold, cubed for dough |
| Granulated Sugar 🍚 | 1 cup | White sugar preferred |
| Packed Brown Sugar 🍚 | ½ cup | Light or dark brown |
| Large Eggs 🥚 | 2 whole | Room temperature |
| All-Purpose Flour 🌾 | 2 ½ cups | Spooning and leveling |
| Baking Soda 🧂 | ½ tsp | Pure baking soda |
| Salt 🧂 | ½ tsp | Fine sea salt |
| Vanilla Extract 🍯 | 1 tsp | Pure vanilla extract |
| Milk 🥛 | ½ cup | Whole milk preferred |
| Semi-Sweet Chocolate Chips 🍫 | 1 cup | Hershey's preferred |
| White Chocolate Chips 🍫 | ½ cup | For contrast texture |
| Mint Extract 🍃 | ½ tsp | Optional for extra mint |
The Hershey's Mint Kisses are non-negotiable here—freshly crushed makes all the difference. Grab a bag of 100-count from any grocery store (they're usually near the candy display), and use a rolling pin to crush them. Costco sells them in bulk if you're making a big batch. For the chocolate chips, Hershey's brand is best—those generic store brands melt unevenly. The butter? Cold and cubed is key—don't let it soften before mixing. I always buy Land O'Lakes or Plugrá for the best texture.
No mint extract? Skip it—the crushed kisses give enough flavor. Running low on white chocolate? Use extra semi-sweet—just know the color will be darker. The milk can be any kind, but whole milk gives the dough that perfect richness. For the sugars, brown sugar should be packed—if it's not, tap the measuring cup on the counter to settle it. The vanilla extract matters—pure, not imitation—and a little goes a long way. Pro tip: If you're short on time, microwave the butter 40 seconds to just melt it before mixing with the sugars.
Dough keeps best covered in the fridge for 3 days—just let it sit at room temp for 30 minutes before baking. For extra festive flair, freeze portions of dough in balls for up to 3 months. The cookies reheat beautifully—30 seconds in the microwave brings back that gooey chocolate center. Store baked cookies in an airtight container with parchment between layers so they stay crisp. Double the batch—they disappear fast during the holidays.
Why You'll Love This Recipe
- Here’s what sold me: I use pantry staples (butter, sugar, eggs) and a single bag of mint kisses to make a batch that feeds a crowd. The leftovers? They last forever in an airtight container, so I’m always covered without breaking the bank.
- No-Mix Magic: I swear by this recipe—just cream butter and sugars, fold in eggs, and drop spoonfuls of dough onto a tray. The Hershey’s Mint Kisses melt right into the warm centers, so you get that perfect balance of crispy edges and gooey, minty surprises.
- Minty Bliss: Honestly, the flavor combo is next-level: rich chocolate from the kisses, buttery caramel from the brown sugar, and that cool peppermint finish. It’s like a holiday in every bite, and I’ve never met anyone who doesn’t reach for seconds.
- Party Ready: These cookies are my secret weapon for last-minute gatherings. They’re sturdy enough to pack in a tin, hold their shape, and still taste fresh—whether it’s a potluck, teacher gift, or just a lazy Sunday with coffee. (Yes, even on a Tuesday night.)
Step-by-step instructions for Hershey's mint kisses cookies
Here's how to make these festive, melt-in-your-mouth cookies with that perfect chocolate-mint balance.
Crush the Mint Kisses and Cream the Butter
First, crush the 1.5 cups of Hershey's Mint Kisses into fine pieces using a rolling pin or food processor. You want them small enough to melt evenly into the dough but still noticeable in each bite. Set them aside.
In a large mixing bowl, combine the 1 cup of cold, cubed unsalted butter with the 1 cup of granulated sugar and 0.5 cup of packed brown sugar. Use a hand mixer or stand mixer on medium speed and beat for 3-4 minutes until light and fluffy. The mixture should nearly double in volume and look pale yellow. This creaming process incorporates air, which gives the cookies their signature texture.
Add Eggs, Vanilla, and Dry Ingredients
Add the 2 whole large eggs one at a time, mixing well after each addition. Then stir in the 1 teaspoon of vanilla extract and the 0.5 teaspoon of mint extract (if using). The mint extract adds a subtle, refreshing kick that pairs perfectly with the chocolate.
In a separate bowl, whisk together the 2.5 cups of all-purpose flour, 0.5 teaspoon of baking soda, and 0.5 teaspoon of salt. Gradually add the dry ingredients to the wet mixture, mixing on low speed just until combined. Avoid overmixing—you should still see a few flour streaks. Once incorporated, stir in the 0.5 cup of milk to create a smooth, thick dough.
Fold in Chocolate and Chill the Dough
Gently fold in the 1 cup of semi-sweet chocolate chips, 0.5 cup of white chocolate chips, and the crushed mint kisses using a spatula. Make sure they're evenly distributed throughout the dough. If the dough feels too sticky, chill it for 10-15 minutes to firm up slightly.
Once the dough is ready, cover the bowl with plastic wrap and refrigerate for at least 1 hour (or up to 24 hours). Chilling is crucial—it prevents the cookies from spreading too much in the oven and allows the flavors to meld. This step also makes the dough easier to handle when scooping.
Bake to Golden Perfection
Preheat your oven to 375°F and line two baking sheets with parchment paper. Using a cookie scoop or tablespoon, drop 1.5-tablespoon-sized balls of dough onto the prepared sheets, spacing them 2 inches apart. They won't spread much, but you want room for them to grow.
Bake for 9-11 minutes until the edges are golden brown and the centers look just set. The cookies should pull away slightly from the edges of the baking sheet but still be soft in the middle. Remove them from the oven and let them cool on the baking sheet for 5 minutes before transferring to a wire rack. The mint kisses will soften slightly as they cool, creating pockets of minty goodness in every bite.
Enjoy Warm or Store for Later
Serve the cookies warm for the ultimate experience—the chocolate will be gooey, and the mint flavor will be bright and refreshing. If storing, let them cool completely and keep them in an airtight container at room temperature for up to 5 days. For extra indulgence, sprinkle a little extra crushed mint kisses on top before serving.
These cookies are perfect for holidays, potlucks, or just treating yourself to a little chocolate-mint magic. The combination of dark and white chocolate with the crushed mint kisses makes every bite feel like a festive surprise!
Pro Tips For Making Hershey Mint Kisses Cookies
- Chill the Dough: After mixing, pop the dough in the fridge for at least 30 minutes—yes, even if you’re eager to bake. I learned this the hard way when my first batch spread into sad, flat pancakes. The mint kisses need that structure to stay intact while baking.
- Melt the Butter Slowly: Warm the butter in a bowl over hot water (double boiler style) until it’s just melted, not steaming. Dumped straight from the fridge, it’ll create lumps that ruin the texture. Trust me, your cookies will thank you later.
- Chop the Kisses Small: Roughly chop the mint kisses into tiny pieces—think rice-sized, not whole candies. This ensures even distribution and prevents any single cookie from being overpoweringly minty. (I once had a batch where half tasted like candy, the other half like dough.)
- Use Room-Temp Eggs: Crack the eggs straight from the fridge, but let them sit in the bowl for 5 minutes before mixing. Cold eggs make the dough stiff and can cause cracks when baking. Room-temp eggs blend smoother and guarantee a tender cookie.
Essential equipment for great hershey mint kisses cookies
Mixing Essentials
Start with a stand mixer like the KitchenAid Artisan Series—its powerful motor handles the heavy butter-sugar creaming effortlessly. For hand mixers, the Cuisinart Power Advantage delivers consistent results. I always use medium-speed attachments to avoid splattering sugar while creaming.
A wire whisk comes in handy for combining dry ingredients in a separate bowl before folding into the wet mix. 💡
Crushing Tools
A rolling pin is my go-to for crushing Hershey's Mint Kisses—place them in a sealed plastic bag and roll gently until finely broken. For larger batches, a food processor (like the Ninja BN601) works faster.
Avoid a blender—it turns the kisses into powder, which alters the texture. Store crushed kisses in an airtight container to preserve freshness.
Measuring Precision
Invest in a scale (like the OXO Good Grips) for accurate flour and sugar measurements—spooning and leveling can vary by up to 10 grams. For wet ingredients, use liquid measuring cups with spouts to avoid spills.
A cookie scoop (I use a Wilton 1.5-tablespoon) ensures uniform dough balls, which bake evenly. Pre-measure all ingredients before starting to streamline the process. ✨
Baking Setup
Two half-sheet baking pans (like Chicago Metallic) fit perfectly in most home ovens, maximizing space. Line them with parchment paper—I swear by Silpat for easy release. A digital oven thermometer (I recommend Thermoworks Thermapen) ensures your 375°F setting is accurate.
For even baking, rotate pans halfway through the 9-11 minutes if your oven has hot spots. 🌡️
Cooling and Finishing
After baking, transfer cookies to a wire cooling rack (I prefer OXO Good Grips) to prevent soggy bottoms. For decorating, keep extra crushed mint kisses in a small bowl with a fine-mesh sieve for even sprinkling.
A pastry brush helps apply melted chocolate drizzle neatly. Store baked cookies in stackable silicone containers to save fridge space. 💫
Nutrition facts
Frequently asked questions
Can I make these cookies without mint extract?
The crushed Hershey's Mint Kisses provide all the mint flavor you need. The extract is optional and only adds a subtle boost—skip it if you don't have it, but make sure to use 1.5 cups of finely crushed kisses for that signature taste.
Why do my cookies spread too much?
Over-spreading usually means the dough was too warm when baking. Always chill the dough for at least 1 hour before scooping. Also, use cold butter when creaming and avoid overmixing the batter. For extra insurance, bake at 350°F instead of 375°F for 11-12 minutes.
How can I make these cookies look extra festive?
Sprinkle additional crushed mint kisses on top right after baking while they're still warm. For a professional touch, drizzle with melted white chocolate and add a pinch of flaky sea salt. Store-bought sprinkles also work—try silver or gold ones for holiday sparkle.
Can I substitute white chocolate chips?
Yes, but the flavor will be slightly different. Use 1 cup of semi-sweet chocolate chips instead for a richer chocolate taste. For texture contrast, try peanut butter chips or toffee bits. The mint flavor will still shine through—it's the star of the show!
How do I store leftover dough?
Wrap the dough ball tightly in plastic wrap and refrigerate for up to 3 days. For longer storage, freeze the dough balls on a tray, then transfer to a freezer bag for 3 months. Thaw in the fridge overnight before baking. The flavor actually improves after resting!