Main Courses
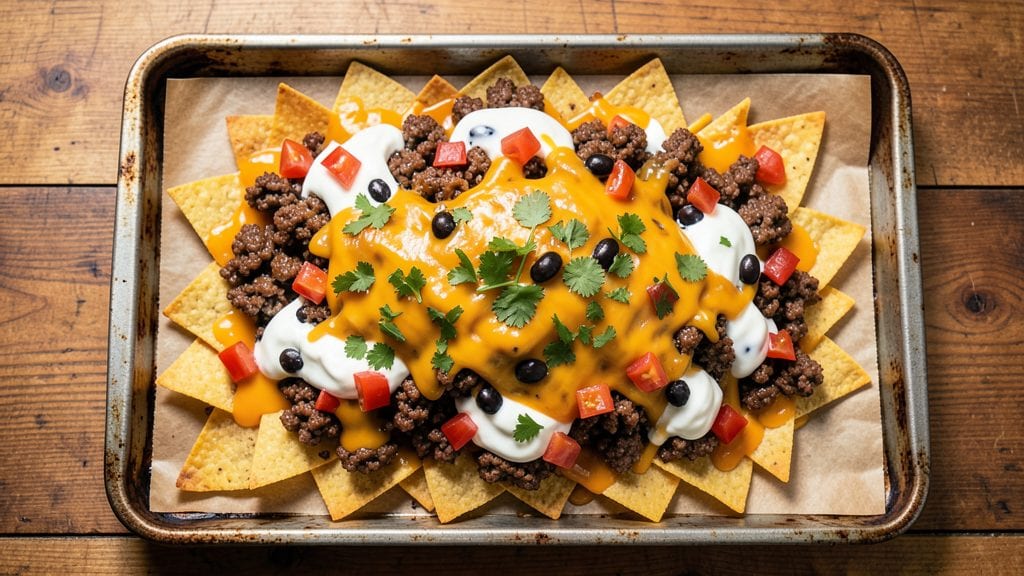
This cookie sheet nachos recipe transforms a simple sheet pan into a crispy, cheesy masterpiece that rivals restaurant-style nachos—without the mess. The secret lies in layering tortilla chips with melted cheese and your choice of toppings, then baking until golden and bubbly.
I perfected this method after years of hosting game days, where it became the crowd-pleaser that never fails to disappear.
What makes this recipe work is the 5-minute prep and 10-minute bake—ideal for weeknights or last-minute gatherings. You control the crispiness by baking just until the cheese melts, ensuring each tortilla chip stays sturdy.
The method scales effortlessly, whether feeding a small family or a hungry crowd, and customization is endless: swap proteins, add beans, or load up on veggies.
By the time it emerges from the oven, you’ll have a crispy, cheesy tower of nachos with perfectly melted cheese pulling on every chip. The aroma alone will have everyone gathering around, and the first bite delivers that satisfying crunch followed by gooey, savory goodness.
Serve with salsa, guacamole, or sour cream for the ultimate crowd-pleaser.
This recipe is your go-to for game day, movie nights, or whenever you crave nachos without the fuss. The key is balancing the layers—don’t overcrowd the sheet—and baking at 375°F for that ideal crispy-cheesy texture. Let’s get started!
Ingredients for cookie sheet nachos
Six cups of chips, three cups of cheese, and a handful of toppings. Game day magic in 15 minutes.
| Ingredient | Amount | Notes |
|---|---|---|
| Tortilla Chips 🍟 | 6 cups | Sturdy variety preferred |
| Shredded Cheese 🧀 | 3 cups | Mild cheddar or Mexican blend |
| Cooked Ground Beef 🥩 | 1 lb | Browned and seasoned |
| Canned Black Beans 🌿 | 1 ½ cups | Drained and rinsed |
| Diced Tomatoes 🍅 | 1 ½ cups | Fresh or canned, drained |
| Sour Cream 🥛 | ½ cup | Full-fat for best texture |
| Salsa 🌶️ | ½ cup | Mild or medium heat |
| Avocado 🥑 | 1 whole | Sliced for garnish |
| Olive Oil 🫒 | 1 tbsp | For light coating |
| Salt 🧂 | ½ tsp | Kosher preferred |
| Garlic Powder 🧄 | ¼ tsp | For seasoning beef |
| Cumin 🌿 | ¼ tsp | Ground for flavor |
| Lemon Juice 🍋 | 1 tbsp | Brightens flavors |
The chips are non-negotiable—sturdy blue corn or flour tortilla chips hold up best, while flimsy store-brand ones turn to dust. Tostitos or Fritos are my go-tos, but any bagged chips work. The cheese? Mexican blend or sharp cheddar melts best, but pre-shredded gets clumpy. Freshly grated from a block is ideal, but we’re not all that fancy. For the ground beef, 80/20 lean-to-fat ratio keeps it juicy, and season it with salt, cumin, and a splash of lemon juice before browning.
No black beans? Pinto beans or refried beans work just as well. Diced tomatoes can be fresh (drained), canned (drained), or even sun-dried for a different twist. Sour cream gets a bad rap, but full-fat is worth it here—it adds richness that low-fat can’t match. Avocado is optional but adds that restaurant-quality touch. Short on time? Pre-cooked chorizo or rotisserie chicken swaps in perfectly. The key is keeping the layers balanced—don’t drown the chips in toppings or they’ll get soggy.
Nachos reheat best at 350°F for 5-10 minutes—just until the cheese is gooey again. Store leftovers in an airtight container for up to 3 days, but honestly, they rarely last that long. For extra crispiness, bake the chips alone for 2-3 minutes before adding toppings. And pro tip: Double the batch—they disappear faster than you can say ‘game over.’
Why You'll Love This Recipe
- I’ll be real: this recipe saved me during my "I only buy beans and rice" phase. Canned beans, pre-cooked beef, chips in the cabinet—it’s the ultimate budget stretch. And leftovers? Reheat in the oven until the cheese gets gooey again. No sad, soggy nachos here.
- No Chopping Needed: I swear by this trick—just dump everything on a sheet pan and bake. No measuring cups, no messy bowls, no stress. My kids help spread the cheese (and lick the spoon), and honestly, it’s the only nacho recipe where cleanup is just wiping one pan.
- Cheese Pulls Hard: That moment when the cheese turns golden and stretchy? Yes. The melty cheddar blankets the beef and beans, while the chips stay crispy at the edges—like a perfect textural hug. Between us, I’ve seen grown men pause mid-bite just to appreciate it.
- Game for Any Night: Game day? Tuesday dinner? Bringing to a potluck? Same recipe, every time. I’ve made these for date nights (with guac on the side) and for feeding my book club (with extra jalapeños). The base is foolproof, so you just tweak the toppings.
Step-by-step instructions for crispy cookie sheet nachos
Here's how to build nachos that stay crispy while delivering that perfect melty cheese experience.
Preheat and Prepare the Cookie Sheet
Preheat your oven to 425°F—this high temperature is key for achieving that signature crispy texture. Line a large cookie sheet with parchment paper or lightly grease it with the 1 tablespoon olive oil using a paper towel. I like to spread it evenly with my fingers so it creates a thin, even layer that won't make the chips soggy.
Next, arrange the 6 cups tortilla chips in a single layer, overlapping them slightly if needed to cover the entire sheet. The goal is to create a solid base that will hold all the toppings without breaking apart when you add the cheese. Press down gently with your fingers to help them stick together—this prevents them from shifting when you add the heavy toppings later.
Layer the Protein and Vegetables
Spread the 1 lb cooked ground beef evenly over the chips, breaking it up with your hands if it's clumped. Then sprinkle the 1.5 cups canned black beans and 1.5 cups diced tomatoes on top, distributing them evenly. For extra flavor, mix the 0.5 teaspoon salt, 0.25 teaspoon garlic powder, and 0.25 teaspoon cumin together in a small bowl, then sprinkle this seasoning blend over the top.
Here's the thing—don't overcrowd the toppings. You want everything to be in one even layer, not piled high in spots. This ensures the cheese melts evenly and the chips stay crispy underneath. If you're worried about the avocado getting mushy, hold off on adding it until after baking—it's better fresh on top of the finished nachos.
Add and Melt the Cheese
Now for the star of the show: the 3 cups shredded cheese. Sprinkle it evenly over the entire surface, making sure every chip gets covered. I like to use a mix of mild cheddar and Mexican blend for that perfect balance of tangy and creamy flavors. Once the cheese is distributed, give the cookie sheet a gentle shake to help it settle into the crevices between the chips.
Pop the nachos into the preheated oven and bake for 8-10 minutes, or until the cheese is fully melted and bubbly. You'll know it's ready when the edges are golden brown and the cheese has pulled away slightly from the chips—this indicates it's melted through but still has that perfect stretch. Keep a close eye on them during the last couple of minutes to prevent over-browning.
Finish and Serve Immediately
Remove the nachos from the oven and let them cool for just 2 minutes—long enough to handle but not so long that the chips lose their crispiness. Then, drizzle the 0.5 cup salsa and 0.5 cup sour cream over the top, spreading them evenly with a spoon. For that final touch, slice the 1 whole avocado into wedges and arrange them on top, along with a squeeze of 1 tablespoon lemon juice to keep them vibrant.
Serve immediately while everything is still hot and crispy. The contrast of the cool avocado and creamy toppings against the warm, melty cheese and crispy chips is what makes these nachos so irresistible. If you're serving a crowd, keep the remaining toppings in small bowls on the side so everyone can customize their own plate.
Pro Tips For Making Cookie Sheet Nachos
- Preheat Like It’s Serious: Your cookie sheet needs 5 minutes under the broiler—no, really, wait for it to scream hot. I used to rush this and end up with sad, greasy chips instead of crispy ones. The cheese won’t melt right if the surface isn’t scorching.
- Drain and Pat Beans: Skip the watery beans—drain them, then press them dry with a paper towel. I learned this the hard way when my nachos turned into a soggy mess. A little extra effort here saves you from a sad, wet pile.
- Layer Cheese Last: Build your nachos in order—chips, meat, beans, tomatoes—then finish with cheese. If you dump it all on first, the bottom chips will turn into a cheesy brick. Trust me, the top layer crisps up best.
- Broil in Batches: Overcrowding is the enemy—work in two pans if needed. I used to shove everything on one sheet and end up with half-baked chips. A little extra time now means no sad, undercooked spots later.
Dietary considerations for these flavors
Gluten-Free Swaps
Skip traditional tortilla chips and use gluten-free corn tortilla chips—brands like Mission or Late July work perfectly. For extra crispiness, bake them alone at 375°F for 2-3 minutes before adding toppings. If you're avoiding gluten entirely, check labels on salsa, seasoning blends, and sour cream for hidden gluten.
For a heartier base, try gluten-free tortillas cut into triangles and baked until crispy. Spread them on the cookie sheet, then layer with cheese and toppings as usual. This method mimics the classic nacho experience while keeping it safe for gluten-sensitive diets. 🌱
Dairy-Free Cheese
Replace traditional cheese with dairy-free shreds like Violife or Daiya, which melt beautifully when baked. For best results, mix them with a little unsweetened almond milk (about 1 tablespoon) to help them bind. These brands also come in tangy varieties that mimic cheddar or pepper jack flavors.
If you're avoiding dairy but still want richness, try cashew cream blended with nutritional yeast and smoked paprika. Spread ½ cup over the baked nachos before adding toppings for a creamy, cheesy texture without dairy. Just don’t expect the same stretchy melt—it’s a delicious compromise!
Low-Carb Options
Swap regular chips for low-carb tortilla chips made from almond flour or cassava, like those from Green Valley Foods. These hold up well under cheese and toppings while keeping carbs in check. Pair them with ground pork or shredded chicken instead of beef to cut carbs further.
For a keto-friendly cheese alternative, use cream cheese mixed with garlic powder and a splash of lemon juice. Spread ¼ cup over the baked nachos to add creaminess without the carbs. Top with pickled jalapeños and guacamole for a flavor-packed, low-carb finish.
Vegetarian Adaptations
Load up on plant-based proteins like black beans, lentils, or crumbled tempeh. For extra heartiness, use chickpeas roasted with smoked paprika—toss 1.5 cups cooked chickpeas with 1 teaspoon smoked paprika and 1 tablespoon olive oil, then roast at 400°F for 15 minutes before adding to the nachos.
Add sautéed mushrooms or bell peppers for umami depth. Sauté 1 cup sliced mushrooms with 1 diced bell pepper in 1 tablespoon olive oil until tender, then sprinkle with ½ teaspoon cumin before layering. This adds texture and flavor without relying on meat. 🌿
Nut-Free Allergies
Skip nut-based toppings like almonds or cashew cream. Instead, use sunflower seed butter mixed with a little water to create a creamy drizzle. For crunch, add toasted pumpkin seeds or crushed tortilla strips baked until crispy. Always double-check labels on pre-made toppings like salsa or seasoning blends.
For a protein boost, use cooked quinoa or edamame instead of beans. Toss 1 cup cooked quinoa with 1 teaspoon soy sauce and ½ teaspoon garlic powder for a savory, nut-free addition. These swaps keep the dish flavorful and safe for nut allergies.
Nutrition facts
Frequently asked questions
Can I make these nachos ahead of time?
Assemble everything except the cheese on the cookie sheet and refrigerate for up to 24 hours. When ready to bake, sprinkle cheese on top and bake at 425°F for 8-10 minutes until melted. For best texture, serve immediately after baking—though they reheat well at 350°F for 5-10 minutes if needed.
What's the best way to keep the chips crispy?
Start with a high oven temperature (425°F) and bake just until the cheese melts (8-10 minutes). Avoid overcrowding the sheet—use a 12x17-inch pan for optimal airflow. For extra crunch, bake the chips alone for 2-3 minutes before adding toppings. The key is speed and even heat distribution.
Can I use pre-shredded cheese without it getting clumpy?
Pre-shredded cheese contains anti-caking agents that make it clump when melted. For best results, buy a block of cheese and shred it yourself. If using pre-shredded, mix it with 1 tablespoon flour or cornstarch per cup to improve texture.
How do I make these nachos vegetarian?
Swap the ground beef for black beans, lentils, or crumbled tempeh. Add roasted chickpeas for extra protein—toss 1.5 cups cooked chickpeas with 1 teaspoon smoked paprika and 1 tablespoon olive oil, then roast at 400°F for 15 minutes before layering. Sautéed mushrooms or bell peppers add great texture too.
Why did my cheese not melt properly?
Underbaking is the most common issue—cheese needs 8-10 minutes at 425°F to fully melt. Also, check your cheese type: Mozzarella or Monterey Jack melt better than hard cheeses like cheddar. If using pre-shredded cheese, it may contain stabilizers that prevent proper melting. Try freshly grated cheese next time.