Desserts
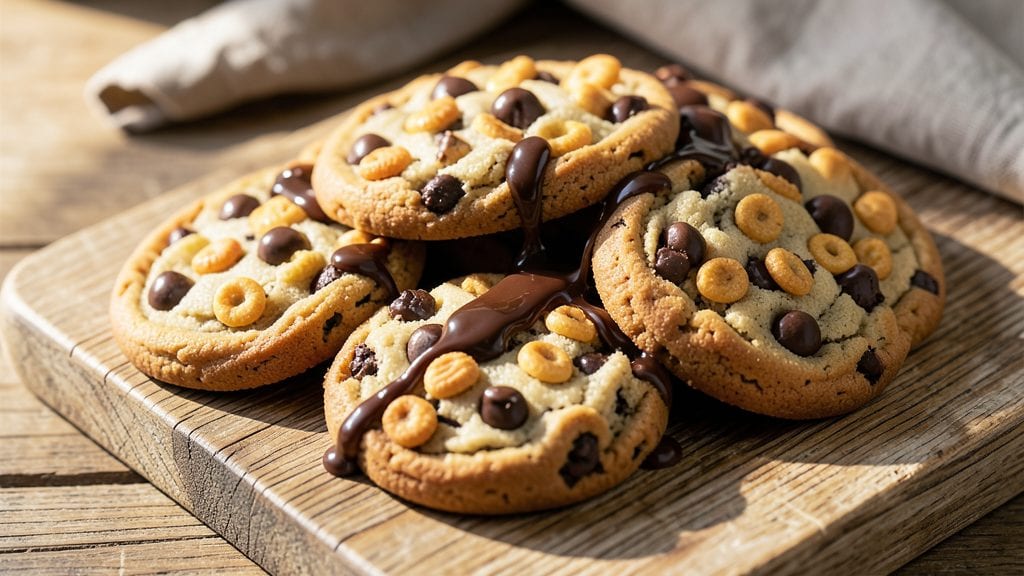
This Cheerios cookie recipe transforms breakfast cereal into irresistible dessert bites that combine crispy oat clusters with chewy vanilla magic—exactly what you need when you crave something nostalgic yet sophisticated. 💛 The secret lies in balancing melted butter and brown sugar for that perfect caramelized texture while keeping the Cheerios just crunchy enough to hold together.
I first tried these during a late-night snack emergency when I had nothing but cereal and chocolate chips, and they became an instant family favorite.
The beauty of these cookies is their simplicity—just five core ingredients plus your choice of mix-ins like chocolate chips or white chocolate drizzle. They bake in 12 minutes to golden perfection, with edges that stay crisp while the centers remain tender.
The vanilla extract adds depth that turns ordinary Cheerios into something extraordinary, and the texture contrast between the crunchy cereal and soft dough creates every bite's magic.
What you'll end up with is a batch of cookies that look like they belong on a bakery tray but taste like a childhood memory—warm, buttery, and packed with that satisfying crunch. These are perfect for holiday cookie platters, potlucks, or just satisfying a sudden sweet tooth craving.
The recipe scales easily, so you can make a single batch for two or double it for a crowd.
Pro tip: Let the dough rest for 15 minutes before baking to ensure even texture, and don't overmix—just combine until the Cheerios are evenly distributed. The result? Cookies that hold their shape, maintain their crunch, and disappear faster than you can say "breakfast for dinner." Let's get baking!
Ingredients for cheerios cookie
Five core ingredients plus your favorite mix-ins—these cookies turn cereal into dessert magic.
| Ingredient | Amount | Notes |
|---|---|---|
| Cheerios Cereal 🥣 | 3 cups | Original flavor, lightly crushed |
| Unsalted Butter 🧈 | ½ cup | Melted, full-fat for richness |
| Packed Brown Sugar 🍯 | ½ cup | Light or dark, doesn't matter |
| Pure Vanilla Extract 💛 | 1 tbsp | High-quality, imitate preferred |
| Large Egg 🥚 | 1 whole | Room temperature for smooth dough |
| Semisweet Chocolate Chips 🍫 | ½ cup | Nestlé or Enjoy Life brand |
| All-Purpose Flour 🌾 | ¼ cup | For binding, Gold Medal preferred |
| Baking Soda 🧂 | ¼ tsp | For lift, not baking powder |
| Kosher Salt 🧂 | ¼ tsp | Diamond Crystal preferred |
| White Chocolate Chips 🍫 | ¼ cup | Optional, for drizzle |
The Cheerios are the star, so grab the original flavor—they hold their crunch better than honey-nut or frosted. Trader Joe's and Costco usually have bulk bins, but the regular grocery store box works too. Lightly crush them in a bag with a rolling pin (about 10 seconds)—just enough to break up the clusters, not turn them into dust. The butter needs to be full-fat for that rich, caramelized flavor. Plugrá or Land O'Lakes are my go-tos, but any unsalted butter will work. Melt it in 10-second bursts in the microwave to avoid burning. The brown sugar should be packed—tap the measuring cup on the counter to settle it. And vanilla? McCormick or Nielsen-Massey are reliable, but if you've got a fancy bottle, use it.
No chocolate chips? Toffee bits or chopped nuts add a great crunch. Short on vanilla? Almond extract at half the amount works in a pinch. The flour is just for binding—don't skip it, but don't overthink it either. King Arthur or Bob's Red Mill are great if you're into that, but basic all-purpose flour is fine. The baking soda and salt are easy swaps: baking powder won't work here (it's too strong), and use any salt you've got—just measure carefully. For the white chocolate drizzle, Ghirardelli chips melt the smoothest, but any brand in a bag works. Pro tip: microwave the chips in 20-second bursts, stirring in between, until fully melted.
Dough keeps for 2 days in the fridge, covered tightly. The cookies? 3 days at room temp in an airtight container, or 1 week in the fridge. Freeze the dough balls for 3 months—bake straight from frozen, adding 1-2 minutes to the time. I always make a double batch and freeze half. The chocolate chips stay fresh for 1 year in the pantry, so no rush to use them up. Store them in a sealed container away from heat.
Why You'll Love This Recipe
- No Pantry Panic: I’ll never stress over missing flour again. These cookies rely on Cheerios for structure—crush them, mix in softened butter and brown sugar, and you’re basically done. The egg and vanilla bind it all like magic, with zero measuring headaches.
- Buttery Crunch Magic: That crispy Cheerio edge with the soft, caramelized center? It’s the kind of texture that makes you pause mid-bite. The brown sugar keeps them chewy, while the vanilla adds this unexpected warmth that feels like a hug.
- Snack Attack Ready: I keep a batch in the freezer for lazy afternoons or when friends drop by. They’re sturdy enough to pack in lunches (no squishing!) and taste just as good cold as they do warm. Honestly, I’ve eaten these straight from the jar in the fridge—no judgment.
- Pocketbook-Friendly Win: Using pantry staples means I’m not breaking the bank for fancy ingredients. A whole box of Cheerios goes a long way, and the butter/brown sugar combo is always cheaper than pre-made cookie dough. Plus, they’re small—so one batch stretches across days without waste.
Step-by-step instructions for Cheerios cookies
Here's how to make these magical crunchy clusters with perfect texture every time.
👨🍳 Step 1: Crush the Cheerios Cereal
Place the 3 cups Cheerios Cereal in a large resealable plastic bag. Using a rolling pin or heavy pan, gently crush the cereal until it's about half the original size—you want clusters that hold together but still have texture. I like to work in batches so I don't crush everything too fine.
This crushing step creates the signature crunchy texture these cookies are famous for. If you're worried about crushing some too small, don't stress—just toss those into the mix anyway. The variation adds character to each bite. Once crushed, spread the pieces on a baking sheet to use immediately or store in an airtight container for up to 1 week.
🍳 Step 2: Melt Butter and Mix Wet Ingredients
In a medium saucepan over low heat, melt the 0.5 cup Unsalted Butter until completely liquid but not browned. Remove from heat and stir in the 0.5 cup Packed Brown Sugar and 1 tbsp Pure Vanilla Extract until fully combined. Let the mixture cool for 5 minutes—it should be warm to the touch but not hot.
While the butter mixture cools, crack the 1 whole Large Egg into a separate bowl. The egg needs to be at room temperature for the dough to come together smoothly. I always test by pressing my finger into the egg—if it springs back, it's ready. If it's still cold, let it sit at room temperature for another 10 minutes.
🥘 Step 3: Combine All Ingredients
In a large mixing bowl, combine the crushed Cheerios, melted butter mixture, egg, 0.5 cup Semisweet Chocolate Chips, 0.25 cup All-Purpose Flour, 0.25 tsp Baking Soda, and 0.25 tsp Kosher Salt. Using a wooden spoon or silicone spatula, mix gently until everything is evenly distributed. The dough will be thick and sticky—this is normal and exactly what we want.
Fold in the 0.25 cup White Chocolate Chips (if using) at the end, reserving a few for garnish. Here's the thing—don't overmix. Just combine until the chocolate chips are distributed evenly. Overmixing develops gluten in the flour, which can make the cookies tough instead of chewy. The dough should hold together when pressed but still be crumbly in texture.
🔥 Step 4: Bake the Cookies
Preheat your oven to 350°F and line a baking sheet with parchment paper. Using a cookie scoop or tablespoon, drop rounded spoonfuls of dough onto the prepared baking sheet, spacing them about 2 inches apart. They won't spread much, so you can place them a bit closer than you might with regular cookies.
Bake for 10-12 minutes until the edges are golden brown and the centers look slightly underdone. The cookies will continue to set as they cool, so don't worry if they look a bit soft when you take them out. Remove from the oven and let them cool on the baking sheet for 5 minutes before transferring to a wire rack.
⏰ Step 5: Add Finishing Touches
While the cookies are still warm, use a spoon to drizzle any reserved white chocolate chips on top for that classic Cheerios cookie look. For extra decadence, you can also melt a few extra white chocolate chips with a splash of milk and drizzle over the cookies. Let them cool completely before serving—this helps the chocolate set properly.
These cookies are best enjoyed at room temperature, though they're delicious warm too. Store in an airtight container at room temperature for up to 5 days, or freeze for up to 3 months. The crunchy texture softens slightly over time, but they still taste amazing. Trust me, once you try these, they'll become a regular in your cookie rotation!
Pro Tips For Making Cheerios Cookie
- Pulse, Don’t Crush: DESCRIPTION: I learned this the hard way—when you dump Cheerios into the food processor and go full throttle, you end up with cereal dust instead of crunchy bits. Hit pulse 3-4 times, then check the size. You want uneven chunks, not powder. (Yes, this means stopping to eyeball it—trust me, your cookies will thank you.)
- Brown the Butter First: DESCRIPTION: That unsalted butter isn’t just for melting. Nuke it in a saucepan over medium heat until it’s golden and smells nutty (about 5 minutes). Let it cool slightly before mixing—this adds depth the recipe won’t tell you about. (Your cookies will taste like they came from a bakery, not a box.)
- Chill the Dough Hard: DESCRIPTION: Skip this, and your cookies will spread into sad, flat pancakes. Wrap the dough in plastic and stash it in the fridge for at least 2 hours—or overnight if you’re patient. Cold dough = thick, chewy cookies. (I know, I know, but resist the urge to rush.)
- Use Cold Eggs: DESCRIPTION: Grab that egg straight from the fridge—room temp eggs make the dough too soft, and your cookies lose their structure. Crack it into an ice water bath for 10 seconds if you’re really impatient, but cold is non-negotiable. (Your future self will curse you if you skip this.)
Serving suggestions for leftovers
Classic Presentation
Serve these cookies warm straight from the oven on a wooden board or ceramic platter to highlight their golden edges and white chocolate drizzle. I love arranging them in a sunburst pattern—start with one cookie in the center, then place others in concentric circles radiating outward.
This creates a visually stunning display that’s perfect for holiday gatherings or dessert parties. 💛
For an extra touch, sprinkle a pinch of flaky sea salt over the top just before serving. The salt enhances the sweetness and adds a sophisticated contrast.
I also like to pair them with a small glass of cold milk or vanilla chai latte to complement the vanilla notes in the cookies. The warmth of the drink balances the crunchy texture beautifully.
Gift-Worthy Packaging
These cookies make fantastic gifts, so package them in mini mason jars or clear cellophane bags tied with twine and a handwritten tag. I like to add a sprig of fresh rosemary or a cinnamon stick for a rustic touch.
The clear packaging lets recipients see the crunchy Cheerios and chocolate chips, making them irresistible. For a more elegant look, use gold foil-lined boxes from craft stores.
If you're giving them as a hostess gift, include a mini scoop (like a 1-tablespoon ice cream scoop) so guests can easily portion out individual cookies.
I’ve also seen people use small wooden cookie cutters shaped like stars or hearts to press into the dough before baking—this adds a playful element that kids love. 🌟
Make-Ahead Serving
For events where you need to serve cookies ahead of time, bake them 24 hours in advance and store them in an airtight container at room temperature. Reheat for 10-15 seconds in the microwave just before serving to restore some of the crunch.
I always bring these to potlucks because they’re foolproof—no one ever guesses they’re made with cereal! 🍪
If you’re serving a crowd, arrange the cookies on a tiered stand with the largest batch on the bottom and smaller variations (like adding peanut butter chips or crushed pretzels) on the top tiers.
This not only looks impressive but also makes it easy for guests to grab their favorites. Don’t forget to label any allergens—like tree nuts if you’ve added them—to keep everyone safe.
Dessert Pairings
These cookies pair wonderfully with warm apple cider or spiced chai tea during fall and winter. The cinnamon in the cider complements the vanilla in the cookies, creating a cozy flavor combination.
For summer, try serving them with iced vanilla latte or lemonade—the cool drink cuts through the richness of the butter and sugar. 🍹
For a grown-up twist, serve them alongside dark chocolate-dipped strawberries or espresso affogato. The bitterness of the dark chocolate or espresso balances the sweetness of the cookies, making them feel like a restaurant-worthy dessert.
I’ve even seen people pair them with salted caramel sauce for dipping—trust me, it’s a game-changer!
Nutrition facts
Frequently asked questions
Can I substitute other breakfast cereals for Cheerios?
While original Cheerios work best for their mild flavor and perfect crunch, you can experiment with other cereals like corn flakes, grape nuts, or even toasted oat cereal. Just note that flavors like honey-nut or frosted cereals may alter the taste. For a nutty twist, try granola clusters instead—just crush them slightly before mixing.
Why did my cookies turn out too soft or crumbly?
Too soft? Your oven may have been too hot or the cookies baked too long. Check your thermometer—350°F is critical. For crumbly results, you likely overmixed the dough or didn't use enough butter. The dough should be thick but hold together when pressed. Try chilling the dough for 30 minutes before baking next time.
How do I make these cookies nut-free or gluten-free?
For nut-free, simply omit any nut-based mix-ins like toffee bits. For gluten-free, replace the 0.25 cup all-purpose flour with 0.25 cup gluten-free 1:1 baking flour (like Bob's Red Mill). You may need to add 0.25 tsp xanthan gum to help bind the dough. Test with a small batch first—gluten-free flours can behave differently.
Can I make these cookies without chocolate chips?
Swap the chocolate chips for white chocolate chips, toffee bits, crushed pretzels, or even dried fruit like cranberries or cherries. For a savory twist, try chopped bacon bits or cheddar cheese crisps. Just remember to reduce the flour by 1 tablespoon if using extra-moist mix-ins like dried fruit.
How do I store these cookies to keep them fresh longer?
Store in an airtight container at room temperature for up to 5 days. For longer storage, freeze the baked cookies for up to 3 months—just thaw at room temperature for 10 minutes before enjoying. To revive stale cookies, warm them in the oven at 300°F for 3-5 minutes to restore crunch.